Jenkins+xcodebuild

1.前言

上篇文章已经聊过如何用插件实现Xcode自动化打包,这次我们来聊聊如何用脚本来打包。首先为什么有好好的插件不用,要自己写脚本来实现尼。好简单的,测试说帮我打个某个环境的正式或者发布包,这时你应该懵逼了吧,其实最主要是因为用脚本能实现其他自定义的操作。这次是通过Jenkins选择环境并且选择包类型(测试、正式),然后用脚本打出对应的包。

2.添加选择参数

回到我们的项目配置中的General,里面有参数化构建过程的选项,我们添加一个Choice Parameter参数。这里我假设有两个环境并且对应两个打包类型就有四个选择了。
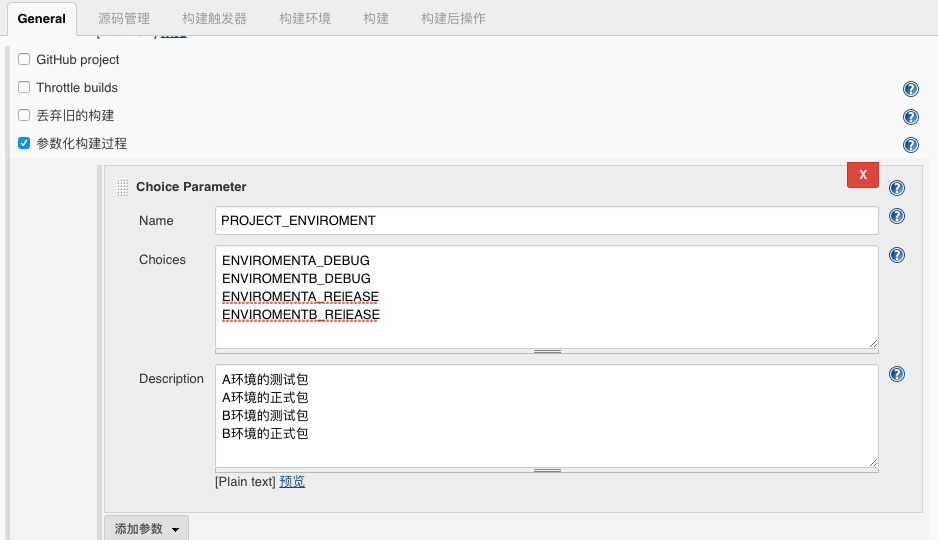
  • Name
    • 参数名称,同时在项目里新建了一个叫PROJECT_ENVIROMENT变量
  • Choices
    • 可选择项
  • Description
    • 可选项的描述

3.更改构建

基于上一篇文章的项目配置下,我们将原来构建的Xcode删掉,新建一个Execute shell

  • Command
    • 你将要执行的命令
    • 命令意思:将要执行工程目录下一个叫package的脚本文件
    • 这个脚本包含了我们打包的命令

4.xcodebuild

4.1官方文档

xcodebuild是Xcode的自带命令,提供了我们常见的bulid、clean等一些操作,我们可以在终端中输入xcodebuild -help查看具体命令,再结合官方文档(官方文档的是旧版命令)。

第一命令是给.xcodeproj的工程使用的,而第二个命令是给.xcworkspace的工程使用的。然后这次我们用到的是第二跟第六个命令,我贴了一些关键的内容帮助我们理解。

1
2
3
4
5
6
7
8
9
10
11
12
13
14
15
16
17
18
19
20
21
22
23
24
25
26
27
28
29
30
31
32
33
34
35
36
37
38
39
40
41
42
43
44
#xcodebuild -help
xcodebuild [-project <projectname>]
-scheme <schemeName>
[-destination <destinationspecifier>]...
[-configuration <configurationname>]
[-arch <architecture>]...
[-sdk [<sdkname>|<sdkpath>]]
[-showBuildSettings]
[<buildsetting>=<value>]...
[<buildaction>]...
xcodebuild -workspace <workspacename>
-scheme <schemeName>
[-destination <destinationspecifier>]...
[-configuration <configurationname>]
[-arch <architecture>]...
[-sdk [<sdkname>|<sdkpath>]]
[-showBuildSettings]
[<buildsetting>=<value>]...
[<buildaction>]...
xcodebuild -version
[-sdk [<sdkfullpath>|<sdkname>] [<infoitem>] ]
xcodebuild -list
[[-project <projectname>]|[-workspace <workspacename>]]
[-json]
xcodebuild -showsdks
xcodebuild -exportArchive
-archivePath <xcarchivepath>
-exportPath <destinationpath>
-exportOptionsPlist <plistpath>
xcodebuild -exportLocalizations
-localizationPath <path>
-project <projectname>
[-exportLanguage <targetlanguage>...]
xcodebuild -importLocalizations
-localizationPath <path>
-project <projectname>
1
2
3
4
5
6
7
8
9
10
11
12
13
14
15
16
17
18
19
-buildaction ...
Specify a build action (or actions) to perform on the target. Available build actions are:
build Build the target in the build root (SYMROOT). This is the default build action.
analyze Build and analyze a target or scheme from the build root (SYMROOT). This requires
specifying a scheme.
archive Archive a scheme from the build root (SYMROOT). This requires specifying a scheme.
test Test a scheme from the build root (SYMROOT). This requires specifying a scheme and
optionally a destination.
installsrc Copy the source of the project to the source root (SRCROOT).
install Build the target and install it into the target's installation directory in the dis-tribution distribution
tribution root (DSTROOT).
clean Remove build products and intermediate files from the build root (SYMROOT).

4.2xcodebuild

1
2
3
4
5
6
7
8
9
10
#第二条命令
xcodebuild -workspace <workspacename>
-scheme <schemeName>
[-destination <destinationspecifier>]...
[-configuration <configurationname>]
[-arch <architecture>]...
[-sdk [<sdkname>|<sdkpath>]]
[-showBuildSettings]
[<buildsetting>=<value>]...
[<buildaction>]...
  • workspace
    • 工程名称
  • scheme
    • 主题名称
  • destination
    • 指定安装设备
    • destination ‘platform=iOS Simulator,name=iPhone’ -destination ‘platform=iOS,name=My iPad’
  • configuration
    • 环境配置,默认只有两个选择(DEBUG或REALEASE),也可以使用其他自己的自定义的。
  • arch
    • 指定构建的架构
  • sdk
    • 指定构建时的sdK,可以为指定sdk名字或者sdk路径
  • showBuildSettings
    • 显示构建设置的列表
  • buildsetting
    • 以键值对的形式覆盖项目的Xcode配置
  • buildaction
    • 这就是我们要执行的操作(上面的buildaction)
1
2
3
4
5
#第六条命令
xcodebuild -exportArchive
-archivePath <xcarchivepath>
-exportPath <destinationpath>
-exportOptionsPlist <plistpath>
  • archivePath
    • .xcarchive文件的路径
  • exportPath
    • 导出后文件存放的路径
  • exportOptionsPlist
    • 新版打包信息需要存放在一个plist文件中(自己新建),plist内容在命令行中有说明。

4.3执行clean操作

1
2
#假设工程ABC
xcodebuild -workspace "ABC.xcworkspace" -scheme "ABC" -configuration "DEBUG" clean

4.4执行archive操作

1
2
#假设工程ABC
xcodebuild -workspace "ABC.xcworkspace" -scheme "ABC" -sdk iphoneos -configuration "DEBUG" archive -archivePath "./ABC.xcarchive"

4.5生成ipa操作

1
2
#假设工程ABC
xcodebuild -exportArchive -archivePath "./ABC.xcarchive" -exportPath "./" -exportOptionsPlist "./exportOptions.plist"

4.6执行结果

1
2
3
** ARCHIVE SUCCEEDED **
····························
** EXPORT SUCCEEDED **

5.App配合

上面的部分主要讲解如何在Jenkins上使用脚本对Xcode项目进行自动化打包功能,还记得我们上面所说的添加选择参数内容,既然可以选择切换环境,当然App也要知道了这个内容才能更改环境。

5.1思路

首先工程项目下有个config.txt文件,然后在Jenkins选了对应环境值,再到构建环节时将环境值存放在config.txt当中。然后当App启动后需要读取config.txt文件确定当前的环境,这样就把整个功能串通了。这部分的功能就不细说,因为实现方式有很多种,最后我补上我方案上的一些关键语句。

5.2脚本

将Jenkins变量存储功能应该放在打包的语句前执行。

1
2
3
4
//将Jenkins中的变量PROJECT_ENVIROMENT
//以键为nowEnv值为PROJECT_ENVIROMENT的形式写入到
//当前目录下的config.txt当中
echo "nowEnv=${PROJECT_ENVIROMENT}" >> "./config.txt"

5.3App

App需要读取config.txt确定当前环境

1
2
3
NSString *filePath = [[NSBundle mainBundle] pathForResource:@"config" ofType:@"txt"];
NSString *dataFile = [NSString stringWithContentsOfFile:filePath encoding:NSUTF8StringEncoding error:nil];
NSArray *dataArr = [dataFile componentsSeparatedByString:@"\n"];

6.预告

下次就聊聊Jenkins里的一些插件的使用。