首页下拉二楼展示

1.前言

前段时间,各大App都比较流行在首页做一个下拉出现二楼的广告位,像淘宝二楼、京东二楼、大众点评二楼等等,各种交互都有,这次我做的是其中一种是偏向当时大众点评的效果,拉出显示背后的图片或者是Gif图,并伴随着转场效果。

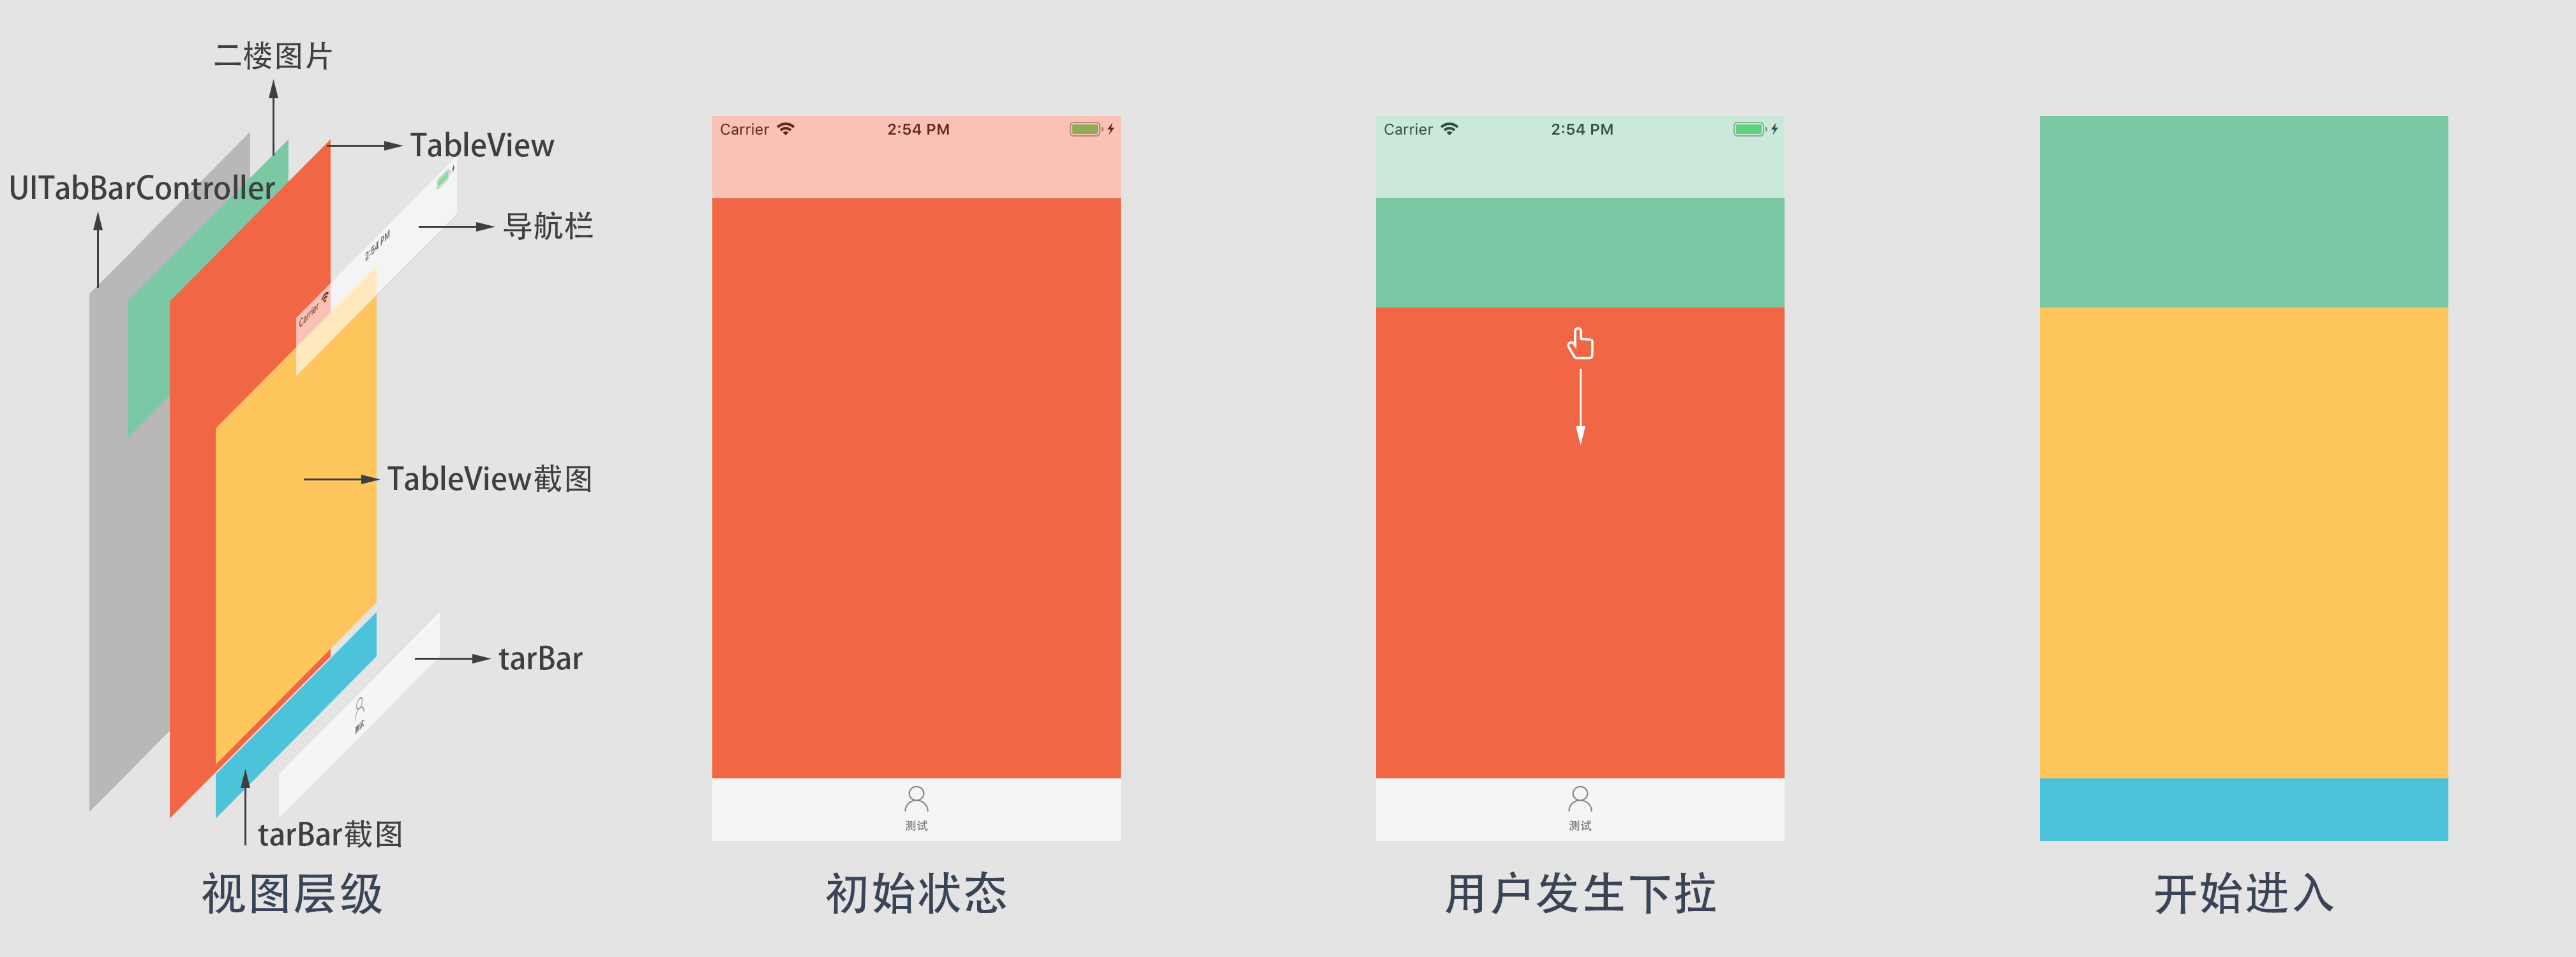
为了更好的理解整个过程,我特意做了一张图方便结合下文理解。其中包括整个视图层级、用户默认看到初始状态、用户发生下拉状态、开始进入下拉状态的理解。

2.背景

通常首页都是用一个TableView,然后TableView的backgroundView已被设置背景图片,用作TableView下拉时背后空白的填充。然后对于二楼广告与TableView背景图,两者是对立的,只能显示其中一个。并且两者大小不一样,所以最后选择在TableView下面嵌入一个View用作二楼广告显示。

3.需求

二楼广告的图有可能是图片也有可能是Gif动画,需要考虑下载与播放的问题,然后整体流程是首页下拉后,可以看到二楼广告。然后到一定距离后会出现进入二楼的提示,并且二楼图片与背景分割之间需要一些渐变消失效果,使得二楼图片与背景更好的融合。当用户放手后就会开始进入二楼,流程如下:先将TableView所滑动后的可视内容滑到底部并消失,再将tabBar渐变消失,最后用自定义转场动画,淡化出现二楼对应跳转页面。

4.实现方案

创建视图

首先,我们需要一个容器装载二楼图片与进入二楼提示内容,再将容器嵌入到TableView之下。

1
2
3
4
5
//背景图
UIView *root = [[UIView alloc] init];
root.frame = CGRectMake(0, 0, TScreenWidth, TScreenHeight);
root.backgroundColor = [UIColor whiteColor];
[self.view insertSubview:root belowSubview:self.tableView];

图片下载显示

图片显示使用SDWebImage/GIF分支的FLAnimatedImageView控件,而图片下载则使用SDWebImageDownloader工具。

Podfile内容

1
2
pod 'SDWebImage', '~> 4.0'
pod 'SDWebImage/GIF'

参考代码

思路:先创建好FLAnimatedImageView,并用SDWebImageDownloader加载所需图片,在图片加载完成后先保留图片的NSData与UIImage数据,以便重新加载所需。保留后设置FLAnimatedImageView图片,设置后再根据图片大小更改FLAnimatedImageView的大小,接着可以设置遮罩层做渐变效果,最后可以调整进入二楼提示标签位置。

1
2
3
4
5
6
7
8
9
10
11
12
13
14
15
16
17
18
19
20
21
22
23
24
25
26
27
28
29
30
31
32
33
34
35
36
37
38
39
40
41
42
43
44
45
46
47
//加入背景图片
FLAnimatedImageView *bg =[[FLAnimatedImageView alloc] init];
bg.contentMode=UIViewContentModeScaleAspectFill;
bg.clipsToBounds = YES;
SDWebImageDownloader *downloader = [SDWebImageDownloader sharedDownloader];
[downloader downloadImageWithURL:[NSURL URLWithString:urlStr]
options:0
progress:^(NSInteger receivedSize, NSInteger expectedSize, NSURL * _Nullable targetURL) {}
completed:^(UIImage * _Nullable image, NSData * _Nullable data, NSError * _Nullable error, BOOL finished) {
//保留数据
self.secondFloorImageData = data;
self.secondFloorImage = image;
//设置Gif
if ([bgUrlStr containsString:@"gif"]) {
FLAnimatedImage *gifImage = [FLAnimatedImage animatedImageWithGIFData:self.secondFloorImageData];
bg.animatedImage = gifImage;
}
//设置图片
else{
bg.image = image;
}
//获取图片宽高
CGFloat w = TScreenWidth;
CGFloat h = image.size.height*TScreenWidth/image.size.width;
//确保图片大小问题
if (image.size.width>0 && image.size.height>0) {
//调整二楼图片大小
bg.frame = CGRectMake(0, 0, w, h);
//加入遮罩
[self addMaskWithSize:CGSizeMake(w, h)];
//加入滑动提示
[self addScrollTirpsToView:root AndSize:CGSizeMake(w, h)];
}
}];
//动画结束
bg.loopCompletionBlock = ^(NSUInteger loopCountRemaining) {
//NSLog(@"播放结束处理");
};
遮罩层

遮罩层主要使用的是layermask属性,先创建一个渐变图层,再设置渐变颜色,再设置渐变层的开始跟结束位置与Frame,最后设为secondFloorImageView(FLAnimatedImageView)的遮罩。

1
2
3
4
5
6
7
8
9
10
11
12
13
14
//添加渐变效果
-(void)addMaskWithSize:(CGSize)imageSize{
CGFloat w = TScreenWidth;
CGFloat h = image.size.height*TScreenWidth/image.size.width;
//加入渐变层
CAGradientLayer *gradientLayer = [CAGradientLayer layer];
gradientLayer.colors = @[(__bridge id)[UIColor whiteColor].CGColor,
(__bridge id)[[UIColor clearColor] colorWithAlphaComponent:0.0f].CGColor];
gradientLayer.locations = @[@0.7, @1.0];
gradientLayer.frame = CGRectMake(0, 0, imageSize.width, imageSize.height);
self.secondFloorImageView.layer.mask = gradientLayer;
}
进入二楼提示标签

进入二楼提示标签只需要单纯调整一下位置即可。

1
2
3
4
5
6
7
8
9
10
11
12
13
14
15
//加入滑动提示
-(void)addScrollTirpsToView:(UIView *)view AndSize:(CGSize)imageSize{
if (!self.scrollTirps) {
self.scrollTirps = [[UILabel alloc] initWithFrame:CGRectMake(0, imageSize.height+10, TScreenWidth, 15)];
self.scrollTirps.hidden = YES;
self.scrollTirps.font = [UIFont systemFontOfSize:15];
self.scrollTirps.text = @"欢迎进入二楼";
self.scrollTirps.textAlignment = NSTextAlignmentCenter;
self.scrollTirps.textColor = [UIColor redColor];
[view addSubview:self.scrollTirps];
}
}

添加监控滑动更新

只要在TableView上添加滑动代理,在代理中可以添加对图片播放处理的操作以及对进入二楼提示标签显示隐藏的操作。首先假设我们加载的图片是Gif的话,FLAnimatedImage是会一直循环播放。所以需要做只有当用户触发下拉操作才开始播放,归位时停止播放,至于二楼提示标签显示可以按照自己所喜欢的滑动距离进行显示与隐藏。

1
2
3
4
5
6
7
8
9
10
11
12
13
14
15
16
17
18
19
20
//滑动触发
- (void)scrollViewDidScroll:(UIScrollView *)scrollView{
float scrollY = tab.contentOffset.y;
//gif图片控制
if ([urlStr containsString:@"gif"]) {
if (scrollY < 0 ) {
if (!self.secondFloorImageView.animatedImage) {
FLAnimatedImage *image = [FLAnimatedImage animatedImageWithGIFData:self.secondFloorImageData];
self.secondFloorImageView.animatedImage = image;
}
}
else{
self.secondFloorImageView.animatedImage = nil;
}
}
...
}

添加监控滑动判断

只要在TableView上添加滑动停止代理,再根据自己所要触发的距离判断是否触发二楼动画转场的开始。

1
2
3
4
5
6
7
8
9
10
//手指离开回调
- (void)scrollViewWillEndDragging:(UIScrollView *)scrollView withVelocity:(CGPoint)velocity targetContentOffset:(inout CGPoint *)targetContentOffset{
//TableView截图设置图片
//tabBar截图设置图片
//执行进入二楼动画
...
}

二楼消失视图布局

首先我们需要知道单纯控制TableView与tabBar做动画,不好控制,并且可能会对后续的恢复显示体验不太友好,所以我采用了控件截图并裁剪出新图作为新动画控件的图片,这样就可以脱离原来的TableView与tabBar。

基础截图功能

注意

需要注意的一点是,传入的rect(CGRect)是需要在原来区域上每个参数都要乘以对应屏幕的缩放比,比如1倍,2倍,3倍。如下:

1
2
3
4
5
6
CGFloat scale = [UIScreen mainScreen].scale;
CGRect rect = CGRectMake(0*scale,
10*scale ,
100*scale,
100*scale);

函数

1
2
3
4
5
6
7
8
9
10
11
12
13
14
15
16
17
18
//指定某个视图的某个区域进行截图
- (UIImage *)snapshotViewImage:(UIView *)view WithRect:(CGRect)rect{
//view控件截图
CGRect viewRect = view.frame;
UIGraphicsBeginImageContextWithOptions(viewRect.size, YES, 0.0);
CGContextRef context = UIGraphicsGetCurrentContext();
[view.layer renderInContext:context];
UIImage *image = UIGraphicsGetImageFromCurrentImageContext();
UIGraphicsEndImageContext();
//裁剪指定区域
CGImageRef imageRef =image.CGImage;
CGImageRef imageRefRect =CGImageCreateWithImageInRect(imageRef, rect);
UIImage *sendImage =[[UIImage alloc] initWithCGImage:imageRefRect];
return sendImage;
}
TableView截图视图准备

TableView的截图应该这么理解,先基于屏幕截图,然后截取可视的TableView部分,x该为0,y该为用户滑动的距离(由于用户下拉,所以移动距离需要绝对值),w(宽度)是屏幕宽度,h(高度)则是屏幕高度减去用户滑动距离再减去tabBar的高度,可能大家会问状态栏跟导航栏的高度尼,其实首页的TableView是基于屏幕零点开始的,所以不需要减去状态栏跟导航栏的高度。再根据截图视图是否有被添加进行判断(视图添加在tabBar上),最后设置图片并更新位置即可。

1
2
3
4
5
6
7
8
9
10
11
12
13
14
15
16
17
18
19
20
21
22
//获取tableview截图
-(void)getTableViewSnapshot:(float)scrollY{
scrollY = -scrollY;
CGRect rect = CGRectMake(0,
(scrollY)*scale ,
TScreenWidth*scale,
(TScreenHeight-scrollY-tabBarH)*scale);
UIImage * tableViewShot = [self snapshotViewImage:self.tabBar.view WithRect:rect];
if (!self.tableSnapshotView) {
self.tableSnapshotView = [[UIImageView alloc] initWithFrame:CGRectMake(0, (scrollY) , TScreenWidth, (TScreenHeight-scrollY-tabBarH))];
self.tableSnapshotView.contentMode = UIViewContentModeScaleAspectFit;
self.tableSnapshotView.backgroundColor = [UIColor whiteColor];
[self.tabBar.view addSubview:self.tableSnapshotView];
}
self.tableSnapshotView.frame = CGRectMake(0, (scrollY) , TScreenWidth, (TScreenHeight-scrollY-tabBarH));
self.tableSnapshotView.image = tableShot;
}
tabBar截图视图准备

tabBar截图跟tableview截图差不多,tabBar位置基本是相对固定的,可能因为是否为iPhone X需要更改一下位置与高度。同样也是再根据截图视图是否有被添加进行判断(视图添加在tabBar上),最后设置图片并更新位置即可,就不上类似的代码了。

视图隐藏与出现

在执行动画前与后都需要重新控制不同视图的显示与隐藏,比如执行前,需要把原来的tabBar、TableView与导航栏隐藏,需要把tabBar与TableView截图控件显示出来。执行后则需要把原来的tabBar、TableView与导航栏显示出出来,但是则需要把tabBar与TableView截图控件从父级移除并置空。比较简单的代码就不上了。

TableView消失动画

整个动画包括消失动画是位移+透明组合动画,所以使用CAAnimationGroup完成,位移距离就是TableView截图高度加上tabBar高度。

1
2
3
4
5
6
7
8
9
10
11
12
13
14
15
16
17
18
19
20
21
22
23
24
25
26
-(void)animationWithTableViewSnapshot{
if (self.tableSnapshotView && self.tableSnapshotView.image) {
//位移动画
CABasicAnimation *anima1 = [CABasicAnimation animationWithKeyPath:@"position"];
CGPoint origins = self.tableSnapshotView.layer.position;
anima1.fromValue = [NSValue valueWithCGPoint:origins];
anima1.toValue = [NSValue valueWithCGPoint:CGPointMake(origins.x, origins.y+self.tableSnapshotView.frame.size.height+tabBarH)];
//透明
CABasicAnimation *anima2 = [CABasicAnimation animationWithKeyPath:@"opacity"];
anima2.fromValue = [NSNumber numberWithFloat:1.0];
anima2.toValue = [NSNumber numberWithFloat:0.0];
//组合动画
CAAnimationGroup *groupAnimation = [CAAnimationGroup animation];
groupAnimation.animations = [NSArray arrayWithObjects:anima1, nil];
groupAnimation.duration = 0.25f;
groupAnimation.removedOnCompletion = NO;
groupAnimation.fillMode = kCAFillModeForwards;
groupAnimation.delegate = self;
[self.tableSnapshotView.layer addAnimation:groupAnimation forKey:@"tableAnimation"];
}
}

注意

因为TableView消失动画与tabBar消失动画是顺序执行的,需要等待TableView消失动画完成后才能执行tabBar消失动画,所以需要监听CAAnimation的代理,所以在下面最后添加了一个键(tableAnimation),这就可以在代理中知道是TableView消失动画即可,监听代码可参考下节。

tabBar消失动画

tabBar消失动画只要单纯加入透明动画即可,同样出于需要在tabBar消失动画执行完成后需要发起转场动画,所以也需要监听CAAnimation的代理和加入对应的键(tabBarAnimation)。

1
2
3
4
5
6
7
8
9
10
11
12
13
14
15
16
17
18
19
20
-(void)animationWithTabbarSnapshot{
if (self.tabBarSnapshotView && self.tabBarSnapshotView.image) {
//透明
CABasicAnimation *anima1 = [CABasicAnimation animationWithKeyPath:@"opacity"];
anima1.fromValue = [NSNumber numberWithFloat:1.0];
anima1.toValue = [NSNumber numberWithFloat:0.0];
//组动画
CAAnimationGroup *groupAnimation = [CAAnimationGroup animation];
groupAnimation.animations = [NSArray arrayWithObjects:anima1, nil];
groupAnimation.duration = 0.25f;
groupAnimation.removedOnCompletion = NO;
groupAnimation.fillMode = kCAFillModeForwards;
groupAnimation.delegate = self;
[self.tabBarSnapshotView.layer addAnimation:groupAnimation forKey:@"tabBarAnimation"];
}
}

动画执行完成监听操作

结合两个动画上述动画的讲解,代码如下。但需要补充一点就是发起转场操作的同时需要在转场完成后执行上文中视图隐藏与出现的操作,所以加了一个延时的操作,将界面恢复原貌。

1
2
3
4
5
6
7
8
9
10
11
12
13
14
15
16
17
18
19
20
21
- (void)animationDidStop:(CAAnimation *)anim finished:(BOOL)flag{
if (flag) {
if (anim == [self.tableSnapshotView.layer animationForKey:@"tableAnimation"]) {
//执行tabBar消失动画
[self animationWithTabbarSnapshot];
}
}
if (flag) {
if (anim == [self.tabBarSnapshotView.layer animationForKey:@"tabBarAnimation"]) {
//进入二楼(push操作)
...
//消失处理(因为转场动画执行时间是1.0s)
[self performSelector:@selector(视图隐藏与出现函数:)
withObject:nil
afterDelay:1.0f];
}
}
}

自定义转场

这个自定义转场只是单纯的做了简单的淡出效果,没有做返回的效果,大概的讲解一下使用流程。

  • 监听导航栏代理(UINavigationControllerDelegate)
1
2
3
- (void)viewDidLoad {
self.navigationController.delegate = self;
}
  • 实现监听函数

监听代理需要注意的是要区分是否是进入二楼的控制器并且是Push操作,具体判断可根据自己添加条件。

1
2
3
4
5
6
7
8
9
10
11
- (nullable id <UIViewControllerAnimatedTransitioning>)navigationController:(UINavigationController *)navigationController
animationControllerForOperation:(UINavigationControllerOperation)operation
fromViewController:(UIViewController *)fromVC
toViewController:(UIViewController *)toVC{
//区分操作
if (operation == UINavigationControllerOperationPush) {
TestMoveTransion *move = [[TestMoveTransion alloc] init];
return move;
}
return nil;
}
  • 实现自定义转场文件

创建一个文件继承自NSObject,并遵守UIViewControllerAnimatedTransitioning协议,暂且叫TestMoveTransion。以下是需要实现的方法

1
2
3
4
5
6
7
8
9
10
11
12
13
14
15
16
17
18
19
20
21
22
//执行时间
- (NSTimeInterval)transitionDuration:(nullable id<UIViewControllerContextTransitioning>)transitionContext{
return 1.0f;
}
//执行内容
- (void)animateTransition:(nonnull id<UIViewControllerContextTransitioning>)transitionContext {
UIViewController *toVC = [transitionContext viewControllerForKey:UITransitionContextToViewControllerKey];
UIView *containerView = [transitionContext containerView];
toVC.view.frame = [transitionContext finalFrameForViewController:toVC];
toVC.view.alpha = 0;
[containerView addSubview:toVC.view];
//单纯的执行淡化动画操作,最后一定要执行[transitionContext completeTransition:YES];代表结束
[UIView animateWithDuration:[self transitionDuration:transitionContext] animations:^{
toVC.view.alpha = 1;
} completion:^(BOOL finished) {
[transitionContext completeTransition:YES];
}];
}